1997 Legacy timing belt replacement - always off by one tooth?

Joined
Apr 19, 2023
Messages
9
Reaction score
0
Hey all,

I recently got a used Legacy and it's proven to be a lot of work. It blew a cam shaft seal and I've been working on replacing it, while we were at it we decided to replace the timing belt so we bought a timing belt kit online.

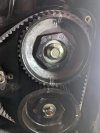
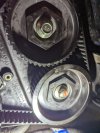
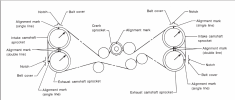
We're finally getting it all back together and we just cannot figure out the timing belt. It is very consistently off by one tooth, and always on the driver side bottom cam shaft.

Is this a common issue at all? We've probably taken it off and put it back on like 10 times now. We started it once but it sounded rough, almost like a tractor, but of course we have the radiator and stuff out so I'm not sure if that would have an effect. We let it run for a maximum of 2 seconds.

I'm really at my wits end here and I'm not financially able to bring it in somewhere. Can anyone point me in the right direction? Because I sure need some help.
 

Attachments

  • PXL_20230415_011602427.MP.jpg
    PXL_20230415_011602427.MP.jpg
    235.8 KB · Views: 13
  • PXL_20230415_003348406.MP.jpg
    PXL_20230415_003348406.MP.jpg
    329.3 KB · Views: 10
I have an ej25d engine.

We have followed instructions and we still cannot get it right.

I have no way of checking the compression.
 

The link to the manual should indicate a DOHC engine
The replacement timing belt should have marks on the crank and cam assemblies.
The ORIGINAL timing belt should have been left ON and have the engine rotated to align the marks in the correct positions.
The new belt can be installed by following the service manual while the engine assemblies are in the correct positions.
Rotating the engine crank or cam assemblies, will strike / smash any valve that is NOT in the correct position.
 
I'm aware of the behavior of an interference engine. We've been careful to keep the engine at TDC. We have a cam shaft immobilizer tool. We replaced the cam shaft seals. The cams have been rotated hundreds of times by us by hand. Just getting them in position is a chore.

We also know how to line up the engine and that's our problem - we line everything up perfectly, and get the belt on, but once we turn the engine over by hand a few times, the driver side exhaust cam is out of alignment by one tooth. A 2 second test start sounded like a tractor - rough, but the radiator is out so maybe that's to be expected, especially with a head gasket leak?
 
Turning the cams while one or more pistons are at top-dead-center will strike the valves and bend them.
Therefore, place the timing belt in the correct position and measure the compression.
Look at the posted video one more time and make sure you have all the correct parts and that there are marks on the replacement timing belt.
 

Attachments

  • Subaru EJ25D Timing Belt.png
    Subaru EJ25D Timing Belt.png
    82.6 KB · Views: 7
The sprocket is lined up with that mark, yes. I've watched that video many times already. Those parts are not a match for my engine. I have the pencil style tensioner. The rest seems correct though.

I have no way of measuring the compression. I am on disability and am doing this myself because otherwise I have to junk the car because it's too expensive to fix.

When trying to put on the timing belt, it ends up one tooth out of alignment no matter what we try.
 
A quality timing belt will have the correct marks to help line up on all the rotating members.
Look at the belt again.
Look at these three and the forth especially
Part 1

Part 2


Last edited:
It's made by Continental contitech. It has timing marks on it. The old belt was also a contitech. It's newish, but was bathed in oil when the driver side exhaust cam seal blew.

I know how to line it up. My problem is, despite lining it up correctly, it is not aligned once we actually get the belt on and do some hand rotations.

I've watched all of these videos before. Taking a second look, I have followed all these directions exactly multiple times.

My timing belt when done looks like the last video. In that video, he says don't worry about it, if it's off as much as it looks like in the video, and *mine is*, that's fine and it'll work.

*Is that true?*

We've assumed it was *not* correct and undid the belt, redid it and got the exact same result. One camshaft off by barely one tooth.

What do you think?
 
It is true and that is why a compression check will prove no engine damage.
If there is no engine damage, go back to the scene of the crime. If the valve cover was removed, were the cams removed as a well?
Are the cam phasers (Variable Valve Timing) installed correctly? Is the engine oil level correct?
If there enough fuel pressure? are all the ignition coils operating? Are all the electronic engine management components / sensors connected for the engine to start?
 
We were extremely careful with the alignment of the sprocket. We never moved a cam without it being aligned to the mark. I think (and hope) valve damage is extremely unlikely.

When turn the crank by hand, it's extremely difficult during what feels like the compression stroke. It feels right.

The engine is in the car, so we opted not to mess with the valve covers. Maybe some other time.

I don't think we have variable valve timing on our engine, I'm pretty sure it's too old. If you can help me confirm, is something I can check?

Oil level is good. We didn't touch the fuel system, or the ignition system, so hopefully those are ok?

But we have removed the radiator, including the ATF coolant tubes and everything else connected to it.

I'm thinking that we should put the car back together more fully and test again, because if that last video is right, it's been aligned correctly this whole time?
 
The ATF cooler lines an be connected with a "fitting" tube / hose / adapter to stop any leakage (temporary by-pass).
At that point, the engine can be started for a few moments without the radiator. 30 Seconds is enough to listen to the engine and test if there are any other anomalies.
A compression test proves the engine components are intact, not the perfect test. A relative compression test is less intrusive but takes more equipment. ie:

If the engine does run smooth and no noise, assemble the radiator, bleed the system of any air locks (take time to measure and test with cooling periods). Measure the transmission fluid level at normal operating temperatures.

With an OBD tool, save the recorded faults and perform the required repairs. When all repairs are completed, reset the throttle adaptation.

If the battery was disconnected, the throttle will require adaptation.
When the ECM is Reset and all DTC's have been cleared, the ECM idle control is also cleared.
If you have SSM3 or SSM4, simply instruct the ECM to set the idle speed.
Aftermarket bi-directional scan tools should be able to adapt the throttle program.
If there is no access to a factory style scan tool, you can recreate the proper conditions for the ECM to relearn idle control and the correct RPM to maintain idle speed under load conditions.
Load conditions include:
Cooling fans ON or OFF
A/C request
Power Steering load request
Transmission load request
Any electrical load request
Procedure:
1. Ensure all power accessories ie: lighting, heater and electrical parasites are OFF.
2. Disconnect the battery negative for 30 minutes.
3. Reconnect the battery negative.
4. Following all steps without touching any switches or pedals. Use the ignition key only.
5. Insert key to the ON position only for 20 seconds.
6a. Turn the key so that the engine starts.
6b. Set timer for 20 minutes.
6c. Let engine idle for 20 minutes.
7. Turn key OFF and leave the key in ignition for 20 seconds.
8. Remove the key.
9. Repeat step 5 and Continue to step 10a when complete.
10a. Turn the key so the engine starts and set timer for 10 minutes.
10b. Let engine idle for 10 minutes.
11. Turn the key OFF and leave key in ignition for 20 seconds.
12. Remove the key. The ECM has relearned idle speed.

Reset the clock, radio stations and electric window one-trip features.
At times, the memory electric seats and remote fobs may not operate. A reset is required.
 
Well I certainly don't have any of those tools either. Literally all of the tools I have are borrowed. I'm also doing this in an underground parking lot, which violates my lease because renters don't need to fix their cars ever apparently. So I can't set up any elaborate tools, and they removed all the wall power down there so I have no way to plug anything in.

But we will try to bypass the ATF and give it a 30 second run. I only have access to an odb2 tool. Will that have any useful information?

Damn, I'm glad we didn't remove the battery. I have no idea what an ssm is.
 
SSM = Subaru Select Monitor is the communication protocol Subaru uses to interrogate the installed controllers.
OBD 2 is for engine diagnostics, is limited but it works.
At least it will provide fault codes. A few have been created by now, delete them, cycle the key and read for faults again.
 
Hi, I also have a 97 Legacy that has been a trouble maker. We found that there can be confusion between what actually fits and works right in that model. We replaced the sprocket with one off Amazon listed as Sprocket Crankshaft (13021AA091), Standard. It fits and has helped fix the issue we had with misfires on cylinders 3 and 4.

I hope this helps!
 
Thank you!

It turns out we were able to slightly pull the sprocket forward causing it to collide with a pulley. We don't have the tools to fix it - we're stuck currently.

Thanks for your tip though!
 

Ask a Question

Want to reply to this thread or ask your own question?

You'll need to choose a username for the site, which only take a couple of moments. After that, you can post your question and our members will help you out.

Ask a Question

Members online

No members online now.

Forum statistics

Threads
13,972
Messages
67,575
Members
7,461
Latest member
eagle1jj

Latest Threads

Back
Top